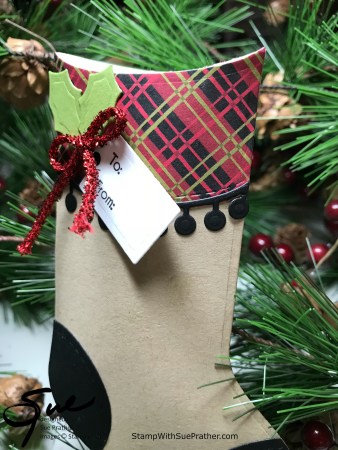
The Trim Your Stocking Thinlits Die set includes a stocking, a pillow box and a wide variety of options for trimming your stocking or decorating a pillow box, treat holder, card, tag and scrapbook page. There are 19 dies total and a coordinating stamp set – Tags & Trimmings. Don’t miss out on this wonderful bundle!
To begin, cut all the pieces needed for assembly. The stocking front and pillow box back are die cut from panels of Kraft cardstock, featured on page 12 of the 2017 Holiday catalog. (Crumb Cake cardstock would work, as well.) The plaid band along the top of the stocking is cut from a panel of DSP from the Christmas Around the World pack. I chose to cut it on the diagonal. The heel and toe pieces and the pom pom trim piece are cut from Basic Black cardstock. The holly leaves are cut from Old Olive cardstock.
Carefully finger fold the curved flap at the top edge of the stocking along the crease line. Do the same with the curved flaps along the top and bottom of the pillow box piece. Apply Tear and Tape adhesive along the tabs on each side of the pillow box. Be sure to cover from one end to the other. Crease the tabs along the score line. Align the top edges of the stocking flap and pillow box flap and adhere the pillow box tabs to the back of the stocking with the Tear and Tape. Decorate the front of the stocking before completing the pillow box.
Adhere the plaid band across the top of the stocking and the toe and heel pieces with Multipurpose Liquid Glue. Apply Liquid Glue to the pom pom trim piece and adhere it along the bottom edge of the plaid band. Use Liquid Glue to adhere the two holly leaves to the band, as well. Tie a small bow with a length of Red Mini Tinsel Trim and adhere at the base of the leaves with a Mini Glue Dot.
To finish the stocking front, stamp the tag stamp from the Tags and Trimmings stamp set on a panel of Whisper White cardstock with Archival Black ink and cut out with the tag die from the Trim Your Stocking Thinlits die set. Tuck the tag under the bow on the front of the stocking and adhere with Multipurpose Liquid Glue.
Complete the assembly of the pillow box by folding up the bottom flap, tucking the rectangular tab inside. You may wish to apply Liquid Glue to the tab to secure to the inside. It’s now ready for a gift card or whatever treats and surprises you have in mind.
*** You can find a list of card stock cuts at the bottom of this post.
Products used to complete this project:
|
|
|||
|
|
|||
|
|
|||
|
|
|
*** Cardstock cuts for this project:
- Kraft or Crumb Cake CS – 6″ x 6-3/4″ panel for stocking front and pillow box back
- Plaid DSP – 3-1/4″ x 3-1/4″ panel for band die cut on the diagonal
- Basic Black CS – 3″ x 4″ panel for heel, toe and pom pom trim die cuts
- Old Olive CS – 2″ x 2″ panel for two die cut leaves
- Whisper White CS – 2″ x 2″ panel for tag


That is too cute Sue! Love the colors that you used. Fantastic project! 🙂
Love this, Sue! The plaid and the Crumb Cake lend a wonderful old-time touch to your wonderful stocking! 🙂